6.5 KiB
faceit_live3
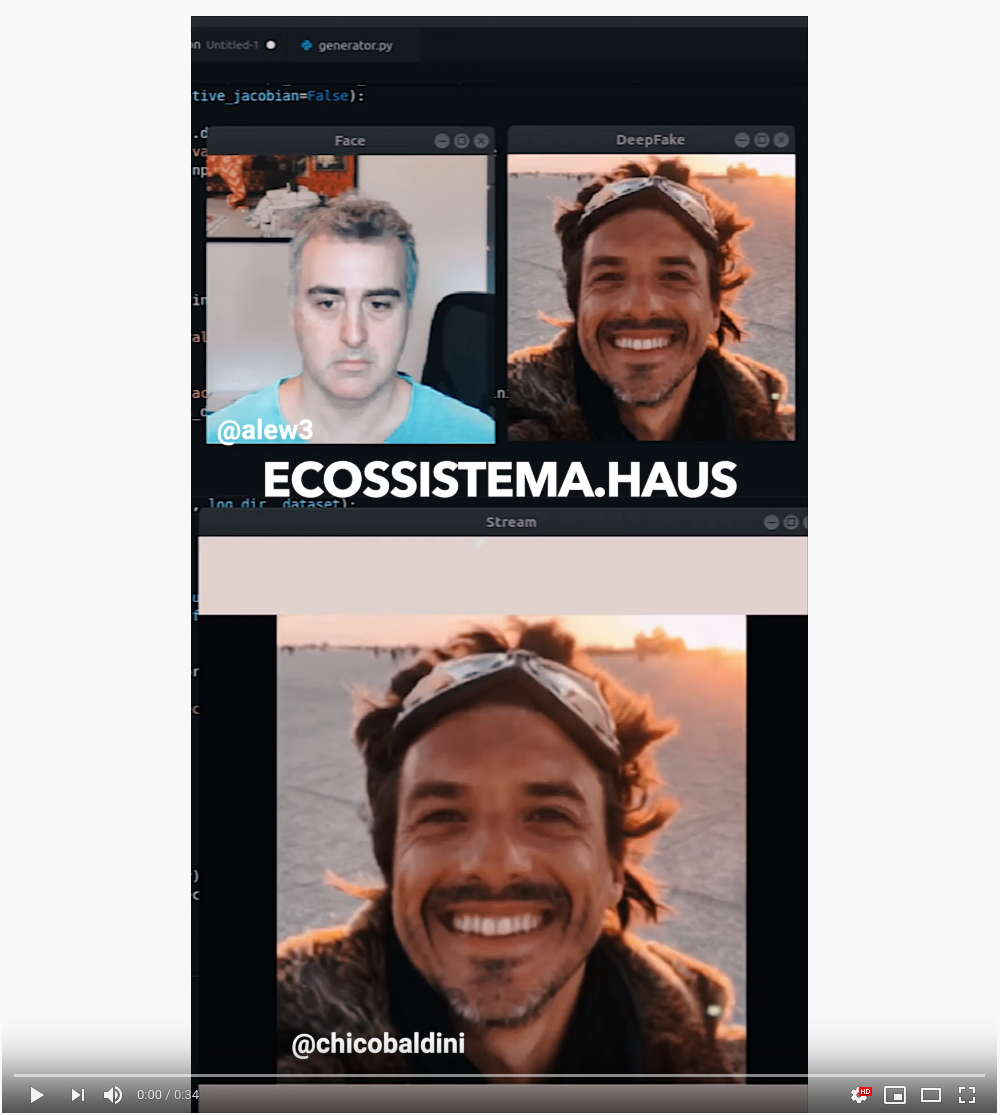
This is an update to http://github.com/faceit_live using first order model by Aliaksandr Siarohin to generate the images. This model only requires a single image, so no training is needed and things are much easier. I've included instructions on how to set it up under Windows 10 and Linux.
Demo
Here is a video of the program running. It uses a single image I took from my friend's Facebook page!
Setup
Requirements
This has only been tested on Ubuntu 18.04 and Win 10 with a Titan RTX/X GPU. You will need the following to make it work:
Linux host OS / Win 10
NVidia fast GPU (GTX 1080, GTX 1080i, Titan, etc ...)
Fast Desktop CPU (Quad Core or more)
Webcam
Clone this repository
Don't forget to use the --recurse-submodules parameter to checkout all dependencies. In Windows you might need to install a Git Client.
$ git clone --recurse-submodules https://github.com/alew3/faceit_live3.git
Download 'vox-adv-cpk.pth.tar' to /model folder
You can find it at: google-drive or yandex-disk.
Install NVidia Deep Learning Drivers / Libs
Install the latest Nvidia video driver then the Deep Learning infrastructure:
- NVidia CUDA 10.1 driver - 2.6GB Download!
- cuDNN version for CUDA 10.1 - you will need to register to download it.
Other versions might work, but I haven't tested them.
Install Anaconda Environment
- Dowload and install Anaconda
Create an Anaconda environment and install requirements
$ conda create -n "faceit_live3" python=3.8
$ conda activate faceit_live3
$ conda install pytorch=1.4 torchvision=0.5 cudatoolkit=10.1 -c pytorch
$ pip install -r requirements.txt
Setup Windows Version
Setup Virtual Camera for streaming
Download OBS Studio for Win and install it, afterwards install the OBS Virtual CAM plugin by following instructions on the page.
After you install Virtual CAM.
- Create a Scene
- Add a Window Capture item to Sources and select the "Stream Window"
- Add a Filter to the Window Capture by right clicking and selecting Filters, then "+" and choose Virtual CAM
- Start the Virtual CAM from the Tools Menu
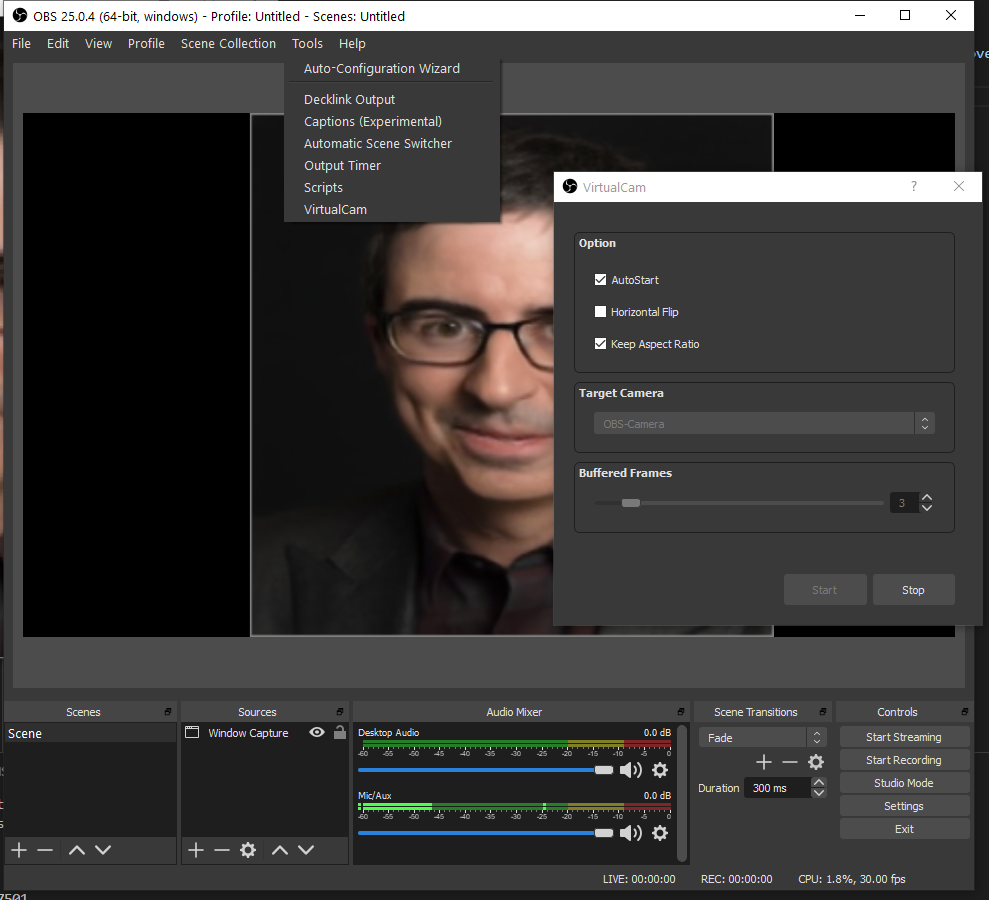
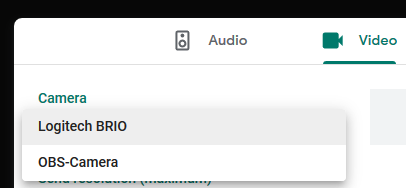
Open Firefox and joing Google Hangout to test it, don't forget to choose the OBS CAM from the camera options under settings.
Setup Linux Version
To use the fake webcam feature to enter conferences with our stream we need to insert the v4l2loopback kernel module in order to create /dev/video1. Follow the install instructions at (https://github.com/umlaeute/v4l2loopback), then let's setup our fake webcam:
$ git clone https://github.com/umlaeute/v4l2loopback.git
$ make && sudo make install
$ sudo depmod -a
$ sudo modprobe v4l2loopback devices=1
$ sudo modprobe v4l2loopback exclusive_caps=1 card_label="faceit_live" video_nr=1
$ v4l2-ctl -d /dev/video1 -c timeout=1000
Change the video_nr above in case you already have a webcam running on /dev/video1
To check if things are working, try running an mp4 to generate a video the /dev/video1 (replace ale.mp4 with your own video).
$ ffmpeg -re -i media/ale.mp4 -f v4l2 /dev/video1 -loop 10
And view it
$ ffplay -f v4l2 /dev/video1
On Ubuntu 18, I had to make a minor change to the source code of v4l2loopback.c to get loopback working. In case the above doesn't work, you can try this change before running make :
# v4l2loopback.c
from
#if LINUX_VERSION_CODE >= KERNEL_VERSION(2, 6, 29)

to
#if LINUX_VERSION_CODE >= KERNEL_VERSION(3,7,0)
You can also inspect your /dev/video* devices:
$ v4l2-ctl --list-devices
$ v4l2-ctl --list-formats -d /dev/video1
Mac Support
Unfortunately, Apple and NVidia have stopped collaborating and CUDA support is no longer available for the Mac. On the Mac it will be very slow as everything will be running on the CPU with no GPU support.
Images
Put in the /media directory the images in jpg/png you want to play with. Squared images that have just a face filling most of the space will work better.
Run the program
$ conda activate faceit_live3
$ python faceit_live.py
Parameters
--system # win or linux (default is win)
--webcam_id # the videoid of the Webcam e.g. 0 if /dev/video0 (default is 0)
--stream_id # only used in Linux. Set the /dev/video number to stream to (default is 1)
--gpu_id # for multiple GPU setups, select which GPU to use (default is 0)
Example
$ python faceit_live.py --webcam_id 0 --stream_id 1 --gpu_id 0 --system linux
Key Shortcuts when running
B - cycle previous image in media folder
N - cycle next image in media folder
C - recenter webcam and create a new base image
T - option to alter between 'Relative' and 'Absolute' transformations mode
Q - to quit and close all Windows
Tip
For better results, look into the webcam when starting the program or when pressing C, as this will create a base image from your face that is used for the transformation. Move away and closer to the webcam to find the ideal distance for better results.
Troubleshooting
Slow
If it is running slow, check that it is running on the GPU using the nvidia-smi command. The Windows Task Manager doesn't report the GPU usage correctly. (Add C:\Program Files\NVIDIA Corporation\NVSMI to your Windows Path to find the command).
Error
If you get the error below under LINUX, it means you haven't started your v4l2loopback.
cv2.error: OpenCV(4.2.0) /io/opencv/modules/imgproc/src/resize.cpp:4045: error: (-215:Assertion failed) !ssize.empty() in function 'resize'
Multiple GPU
If you have more than one GPU, you might need to set some environment variables:
# specify which display to use for rendering (Linux)
$ export DISPLAY=:1

# which CUDA DEVICE to use (run nvidia-smi to discover the ID)
$ export CUDA_VISIBLE_DEVICES=0 (LINUX)
or
$ SET CUDA_VISIBLE_DEVICES=0,1 (WIN)